Saturday, January 29, 2011

Craftgasm!

I seriously wish our family camera had chosen a different night to die.

And I wish that the step-by-step pics I took with my cell phone (when the camera died mid-project) weren't corrupted.

And I wish that our replacement camera wasn't coming all the way from Canada.


All I can say is, whenever I enter my gift wrap area, I have a little craftgasm*. Because I finally got to use this for something ahhhhh-mazing:


...and it was 100% totally and completely my own brilliant, original idea!  Yes, that's a 50¢ wooden cassette tape rack from Goodwill.  And no, I'm not going to post an "after" or give any other hints until I can take a REAL "after" picture.  Wanna guess...?  Anyone who guesses correctly wins a prize!


*By the way, "craftgasm"© is a term I coined a few years ago to describe any craft product/project-related moment that reeeeally excites you.  Like, the instant you see it, you're...excited.  Like, makes your heart rate increase.  IfyouknowwhatImean.  Kind of like this or ooohh, this!


Yes, that's a Sharpie wall.  And yes, my husband knows what it does to me.

Saturday, January 22, 2011

Get Well Soon: part 3, finale

Click here for part 1, prep.
Click here for part 2, arranging.

If I had it to do all over, I would probably hot glue the foam into the basket, then hot glue the stems in as well, using my Crafty Magic Melt Little Dipper Low Temp Glue Pot (which, technically, is still in the package...since I purchased it in high school because it looked so cool).

Despite having reference photos, the final poked-in version turned out a little different than the practice run.  It was kind of hard to see some of the flowers on my tiny camera viewfinder, and some of the insertion angles proved a little difficult to replicate on the first try.  Oh, and since I just used the foam I had (instead of custom fitting some), there were some gaps where I intended to poke a couple of the stems.


Overall, though, I'm pretty happy with the layout.

A couple of the add-ins had to be hacked in order to be attached securely, as opposed to just tucked in for looks.  The eucalyptus bits were popped off of a larger bunch, so I created new stems out of folded-over floral wire.  I did the same for the smaller leaf groupings.

It worked!
Everything in its place.


The back, however, was definitely meant to to be hidden!  Hey, it's proof that I made it myself, right?

After using my beading wire side-clippers to chop off the stick-out parts, I hot glued anything that touched anything else.  Liberally hot glued.  If I was selling this piece, I'd probably cover it all up with felt or something.

But you can't tell once it's in place, can ya?  This was intended to go on the wall, but you could also use it as a table centerpiece.  If you go that route, I'd recommend a round or rectangle basket, since a heart looks kind of wonky straight-on from the side.


I love the way they protrude slightly from the basket — like they're growing, or there's something underneath pushing them out.   :)

This picture is just for scale.  Please ignore the pre-road trip checklist and the misarranged Willow Tree collection.  The latter never got put to rights after the cat fiasco ("fiasco" as in "the shelf wasn't attached to the brackets and he jumped up to hang on the edge and everything flipped onto the floor" fiasco).


Hope you enjoyed my little 3-parter!  I'd love to hear your comments, 'cause it feels like I'm typing to cricket-chirping land — or better yet, become a "follower" AND leave a comment!  Pretty please, with jam and jelly on top (as my 4 year-old says)!   :D

Get Well Soon: part 2, arranging

Click here for part 1, prep.

Now that all our stems are trimmed, we can actually start deciding what goes where.  I laid everything out by color family.  Notice what's missing?  Yep — little miss obtrusive, the ivory rose.  She was too much of a scene-stealer, and this production calls for an ensemble cast.

By the way, don't you love my flower holder?  Does anyone not have one of these white wire shelf things, or at least a white wire basket?  We have this stuff all over the place (much to my chagrin).  It's not very attractive, but it sure is functional.

It was perfect for separating my flowers without crushing them.  Or getting cat hair on them.

First, I started by placing the largest blooms, trying to balance by both size and color.  Yep, still working with an upside-down basket.

Next, the medium-sized clusters and blossoms were added.

Then the smaller sprigs and single buds.  But...uh, oh.  Little miss obtrusive has left a hole in her wake.  See it?  Above the blue mum at the bottom?  No, no — above my shadow.  (Hey, I'm sitting right under the overhead light fixture.)

 She was the right color, but just a little too big, so I decided to do a little deconstruction.  The inside of the flower had a little lip on it, so I had to pull from the bottom (which, in hindsight, made more sense anyway).

Off comes the fake sepal (after inadvertently turning it inside-out).

Next comes the little spacer dude, which was found between each couple layers of petals.

I took off the three largest petal sets, then replaced the two plastic parts.

Voila!  A sizeable ivory rosebud — not too big, not too small.


Perfect!

Next up, adding the eucalyptus (Christmas clearance).


Finally, some leaves tucked here and there.

Now that I have pics of my layout, I'm ready to take everything out!  LOL  Time to turn over the basket, put in the foam, and actually commit.  No going back once you poke those holes!


Click here for part 3, finale.

Get Well Soon: part 1, prep


My mom had her other knee replaced at the beginning of December.  My goal was to take her some flowers while she was recuperating, but my family spent the 6 weeks following her surgery either out of town or contagiously ill.  Besides that delay, my mom doesn't like fresh flowers (they die).  YEARS ago, I put together a sorry excuse of a floral arrangement using her favorite fabric as inspiration: cream, dusty blue, and dusty pink.  (Yes, her fabric IS from the 1990's.)  Anyway, I thought an updated arrangement showing a little more skill was in order.

Do you have any idea how difficult it is to find dusty blue or dusty pink ANYTHING nowadays?

I had to settle for the spirit of the fabric and colors, but I think the mix turned out great.  I wanted something that wouldn't take up any lateral space, so I scoured Goodwill for a wall-hangable container and found two candidates.

Given the color scheme of the arrangement — and the fact that it's too cold to spray paint — I decided against the black.  Plus my mom loves hearts.  We have a winner!  The structure of the basket inspired me to use primarily the blooms as opposed to having any stem showing.  I went shopping for flowers (waiting for the periodic 50% off sale, of course) and pulled some floral foam out of my stash.


I used my fingernails to score a line around the third chunk of foam, then just snapped it apart.


I didn't want any of the foam to show through the holes of the basket, so I "lined" the inside with a scrap of coordinating wired ribbon that ended up being the exact length I needed.


Since I wanted to monkey around with which flowers went where before committing myself to stabbing the craft foam, I had the bright idea to turn over the basket and use it to hold up the flowers while I arranged.

First, however, I just needed to get everything trimmed down to size.  I used the pink rosebuds as "rulers" for clipping the rest of the stems, since theirs were strong and smooth.

This is my favorite flower of all those in the arrangement (and it was the most expensive...of course).

Some stems would be poked in upright.

Some stems would be poked in at an angle.

Enough flowers had been clipped to fill the basket, but it still needed a little something extra.  And man, is that ivory rose obtrusive or what?

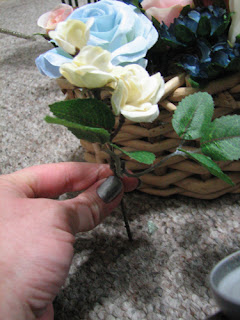
My husband agreed that some leaves were needed for contrast, so I chose the stems that had the nicest looking leaves (and which weren't too long).

When I clipped them off, I deliberately left some of the main stem attached so it would stick in the foam.

The leaves and a few gold-glittered eucalyptus sprigs will definitely add some much-needed life to this arrangement.  Now, to take it apart so I can get on to the actual arranging!

Click here for part 2, arranging!


Visit thecsiproject.com
All Thingz Related
monogram