I love watching my son create. He is so intense and focused, like there's something inside him bursting to get expressed in a particular way. He's 3½.
Our local $1 store has a pretty varied craft section, including a rainbow of foam sun visors. I knew when I saw them that they'd be an awesome craft for my red-haired-and-therefore-sunburnable son Caspian (if he makes it, he'll be more likely to wear it, right?). He chose a white one to decorate.
First, I laid out a couple sheets of newspaper and taped the edges down on the table (including wrapping a little around the edge of the table). Since he usually doesn't like to wear clothes around the house, I didn't bother with a smock. I also removed the little plastic curlicue that holds the visor onto your head.
I offered spray painting, brush painting, and markers as choices for decorating; he decided he'd like to start with markers and move to brush painting. He asked me to draw his name on the visor for him (specifying "small" and "open letters"), then he colored all over it (both in his choice of Sharpie color: blue). Since his name was now obscured by scribbles, I went over the letters again in silver Sharpie. Then I set out my meager selection of plain ol' craft paint and let him choose where to start. He used bristle and foam brushes, plus a bath pouf that was in our painting supplies box. The cool thing is that although he eventually covered the entire visor with paint, when it dried, you could "magically" see the marker again!

I'm pretty sure we'll be doing this craft at his fourth birthday party next month. Instead of gifts (Lord knows he doesn't need any more toys), I'm going to ask each parent to bring 3-4 bottles of acrylic paint and an old shirt or smock for her child to wear. I'll get a visor for each kid and they can go to town! The acrylic paint cleans up so easily, and the parents can have fun by helping their kids use the Sharpies in the beginning. By the time the party is over, the visors should have magically transformed!


 "Wait, mommy — you need wings."
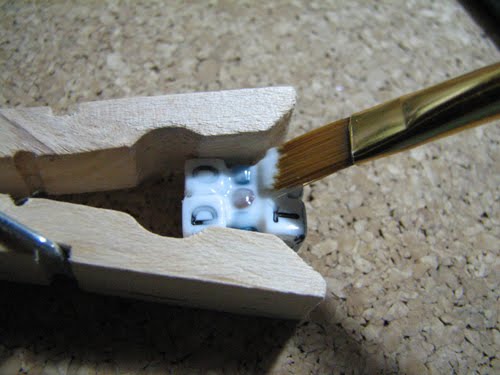
 Yes, they're magnet clips.
 First, silver paint...
 Then switch brushes...
 Now purple...
 He asked me to fill it in the rest of the way with the purple, then he decided to cover up the silver and the marker, too:
 Now brown!
 Then a big ol' dab of white, spounced all over with a bath pouf. Fun!
 completely covered
 set it out to dry where kids and cats can't reach
 LOVE the texture from the pouf!
 All dry...and look what happened!
 Even the under-colors became visible beneath the white texture layer!


 Please feel free to ask questions in comments, and I'll flesh out the tutorial. I ♥ comments and followers! :)