


This is probably one of my favorite projects, probably because so much work went into it. It's always nice when the things you look at every day make you happy. Teal+iridescence+bling+organization+personalization=a happy KatrinkaJane.
This started as a $1.50 memo center from Goodwill. Holes, scrapes, and old wood don't fit into my decor (Lying! They totally match 79% of the stuff at my house, unfortunately), so I bought this with the intent to paint it. Now, what does match my preferred decor is anything painted with Bahama Sea spray paint. Yay! Now that's a big can of happy. It looked a little one-dimensional just in the teal, so I lightly spritzed it with some Sesame Shimmer spray paint as well. After staring at it and pawing through my stash for inspiration, I decided to use more of my iridescent teal marbles to mosaic the top. They were a little large to use alone, so I interspersed them with some smaller ones I picked up at WalMart ($3 for a big bag of teal and green mixed). It still looked kind of ordinary, so I found some gorgeous, blingy, faceted beads in my stash to sprinkle throughout. They really make the most of all those plain little nooks and crannies! (Anybody know the difference between a nook and a cranny, without Googling it?) Add some custom push pins and you're ready to go!


 Arrrghhh! How'd that happen?! It won't even scrape off with a razor. :p


 Ummm...no...that's not my kitchen counter, post-lunch...why?

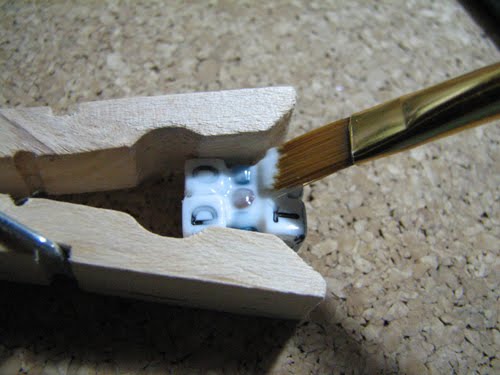
 I had no short, flat push pins, so I modified the ones I had.
 This is how my mom used to poke holes in Barbie's back so the wings from another doll could stick in. :)


Add a little E-6000...
 Find a high-contrast image...

 This is the difference between tracing around the marble with a pencil (outer ring) and what actually fits well on the bottom of the marble.
 Please tell me I'm not the only one who manages to glue shut her Mod Podge every single time...?


 random bling from my bead stash = cute pushpins


Comment with questions, and I'll flesh out my "pictutorial" as needed!
Please check out my other two CSI "wall" entries!


10 comments:
Ooo, I like how it looks like bubbles at the top!
Thanks for stopping by my blog!
Wow, I always wanted to make my own push pins. Now, thanks to you, I now know how! Watch out glass beads, you will now have a new life as my beautiful push pins (or magnets too, right?!)
That turned out really cool! I love the marbles.
You know, you could cover that errant paint on your corkboard with a little frame of ribbon, or just cover the cork with a scrap of fabric.
This look like it was time consuming but it turned out super cool! I love the magnets!
SO cute! I love the push pins and I love how it looks like bubbles or scales on top! SO creative!
I'm following your blog!
Super cute! Love your tacks!
I love the glass beads--really nice.
Very cute! I love the color you painted it. And the beads are really fun!
XOXO
Jen
Wow you did a fab job on this one! I love the little touches you did on the tacks. Yep, I find my Mod Podge glued closed every time. You have every right to be proud of this project.
I love how you personalized this memo center.
Post a Comment